ここまで見てきたように、Cloud9(Amazon Linux 2)においてMySQLサーバプログラムをインストールした場合は、以下のコマンドを入力してデータベースの設定情報を初期化できます。このとき root アカウントのパスワードも設定できるので、SQLの学習に取り掛かる前に済ませておくとよいでしょう。

MySQLの初期化を行うには以下のコマンド sudo mysql_secure_installation を入力します。
$ sudo mysql_secure_installationコマンドを入力すると対話形式の入力が始まります。
$ sudo mysql_secure_installation

NOTE: RUNNING ALL PARTS OF THIS SCRIPT IS RECOMMENDED FOR ALL MariaDB
      SERVERS IN PRODUCTION USE!  PLEASE READ EACH STEP CAREFULLY!

In order to log into MariaDB to secure it, we'll need the current
password for the root user.  If you've just installed MariaDB, and
you haven't set the root password yet, the password will be blank,
so you should just press enter here.

Enter current password for root (enter for none):
Enter current password for root (enter for none): と表示されるので root アカウントのパスワードを入力します。デフォルトでは root アカウントにはパスワードが設定されていないので、何も入力せずにEnterキーを押します。そうすると以下のようなメッセージが表示されます。
Enter current password for root (enter for none):
OK, successfully used password, moving on...

Setting the root password ensures that nobody can log into the MariaDB
root user without the proper authorisation.

Set root password? [Y/n]
さいごの部分で Set root password? [Y/n] と表示されているので Y とタイプすると root アカウントのパスワードを変更できます。
Set root password? [Y/n] Y
New password:
そうすると root アカウントの新規パスワードを求められるので任意のパスワードを入力します。本講座では admin というパスワードを利用することにします。
システム開発の現場では、データベースのパスワードには推測の難しい複雑なものを指定することが一般的です。ここでは学習の進めやすさを優先して簡易なパスワードとしています。
パスワード入力時に打ち込んだパスワードは、ターミナル上に表示されない(見えない)ようになっているので注意してください。また確認用のパスワードも admin と入力すると次のような画面になります。
Set root password? [Y/n] Y
New password:
Re-enter new password:
Password updated successfully!
Reloading privilege tables..
 ... Success!

By default, a MariaDB installation has an anonymous user, allowing anyone
to log into MariaDB without having to have a user account created for
them.  This is intended only for testing, and to make the installation
go a bit smoother.  You should remove them before moving into a
production environment.

Remove anonymous users? [Y/n]
次は Remove anonymous users? [Y/n] と表示されています。これは匿名ユーザを削除するか、という確認です。匿名ユーザはMySQLに簡易にアクセスする仕組みですが削除して構いませんので Y (匿名ユーザを削除する)と入力します。
以降の操作はすべてデフォルトの選択で良いので
Yと入力するか、空の状態でEnterキーを押します。
Remove anonymous users? [Y/n] Y
 ... Success!

Normally, root should only be allowed to connect from 'localhost'.  This
ensures that someone cannot guess at the root password from the network.

Disallow root login remotely? [Y/n]
次は Disallow root login remotely? [Y/n] と表示されています。これは root アカウントによるリモートアクセスを許可しない、という確認です。管理者権限を持つ root アカウントの情報が漏洩してしまうとその被害も大きくなるので、リモートアクセスを無効にすることも多いです。ここではデフォルトの Y (許可しない)を入力します。
By default, MariaDB comes with a database named 'test' that anyone can
access.  This is also intended only for testing, and should be removed
before moving into a production environment.

Remove test database and access to it? [Y/n]
次は Remove test database and access to it? [Y/n] と表示されています。これは test データベースを削除するかという確認です。後ほどMySQLサーバの中に学習用のデータベースを構築するので test データベースは削除しておきましょう。ここではデフォルトの Y (test データベースを削除する)を入力します。
Remove test database and access to it? [Y/n] Y
 - Dropping test database...
 ... Success!
 - Removing privileges on test database...
 ... Success!

Reloading the privilege tables will ensure that all changes made so far
will take effect immediately.

Reload privilege tables now? [Y/n]
最後に Reload privilege tables now? [Y/n] と表示されます。これはMySQLの権限テーブルをリロードするかという意味ですので、デフォルトの Y (権限テーブルをリロード)と入力します。
Reload privilege tables now? [Y/n] Y ... Success!

Cleaning up...

All done!  If you've completed all of the above steps, your MariaDB
installation should now be secure.

Thanks for using MariaDB!
上記のように表示されればMySQLの初期化作業は完了です。
MySQLクライアントプログラムの起動
MySQLの初期化作業が完了したので、さいごにMySQLクライアントプログラムを起動して、MySQLのサーバプログラムにアクセスできることを確認しておきましょう。今回の初期化作業によって root アカウントのパスワードは admin になっている点に注意してください
ec2-user:~/environment $ mysql -u root -p
Enter password:
パスワードに admin と入力して Enterキーを押します。そうするとMySQLのクライアントプログラムが起動できるでしょう。
ec2-user:~/environment $ mysql -u root -p
Enter password:
Welcome to the MariaDB monitor. Commands end with ; or \g.
Your MariaDB connection id is 19
Server version: 10.2.38-MariaDB MariaDB Server
Copyright (c) 2000, 2018, Oracle, MariaDB Corporation Ab and others.
Type 'help;' or '\h' for help. Type '\c' to clear the current input statement.
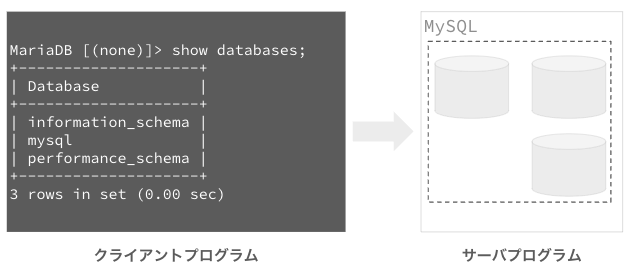
MariaDB [(none)]> それから show databases; と入力してデータベースの一覧を確認してみましょう。
MariaDB [(none)]> show databases;
+--------------------+
| Database           |
+--------------------+
| information_schema |
| mysql              |
| performance_schema |
+--------------------+
3 rows in set (0.00 sec)

MariaDB [(none)]>
上記のように test データベースが削除されていることを確認できます。
以上でMySQLの初期化作業は完了です。それではMySQLサーバ上に新たなデータベースを作成してSQLの学習に取り掛かりましょう。
まとめ
sudo mysql_secure_installationとコマンドを実行することでMySQLを初期化できる- 初期化によって
rootユーザのパスワード変更、リモートアクセスの許可などを設定できる sudoコマンドは管理者権限で実行するという意味